Maneage
Managing Data Lineage
Copyright © 2018-2026 Mohammad Akhlaghi mohammad@akhlaghi.org
Copyright © 2020-2026 Raul Infante-Sainz infantesainz@gmail.com
License Conditions
Next: Customization checklist, Previous: Why Make?, Up: About
Project architecture
In order to customize Maneage to your research, it is important to first understand its architecture so you can navigate your way in the directories and understand how to implement your research project within its framework: where to add new files and which existing files to modify for what purpose.
The project has two top-level directories: reproduce and
tex. reproduce hosts all the
software building and analysis steps. tex
contains all the final paper's components to be
compiled into a PDF using LaTeX. The image below shows
the directory and file structure in a hypothetical
project using Maneage. Files are shown with small,
green boxes that have a suffix in their names (for
example format.mk or
download.tex). Directories (containing
multiple files) are shown as large, brown boxes, where
the name ends in a slash (/).
Directories with dashed lines and no files (just a
description) are symbolic links that are created after
building the project, pointing to commonly needed
built directories. Symbolic links and their contents
are not considered part of the source and are not
under version control. Files and directories are
shown within their parent directory. For example the
full address of format.mk from the top
project directory is
reproduce/analysis/make/format.mk.
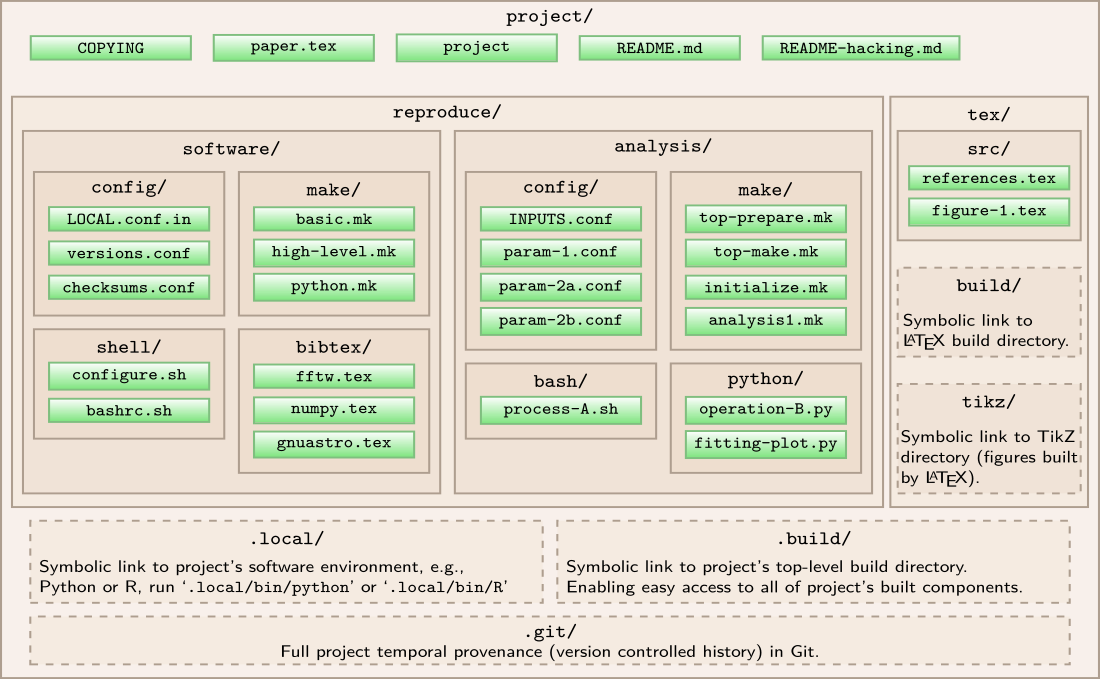
As shown above, the reproduce
directory has two
sub-directories: software and
analysis. As the name says, the former
contains all the instructions to download, build and
install (independent of the host operating system) the
necessary software (these are called by
the ./project configure command). The
latter contains instructions on how to use those
software to do your project's analysis.
After it finishes, ./project configure
will create the following symbolic links in the
project's top source directory: .build
which points to the top build directory
and .local for easy access to the custom
built software installation directory. With these you
can easily access the build directory and
project-specific software from your top source
directory. For example if you
run .local/bin/ls you will be using
the ls of Maneage, which is probably
different from your system's ls (run them
both with
--version to check).
Once the project is configured for your
system, ./project make will do the basic
preparations and run the project's analysis with the
custom version of software. The project
script is just a wrapper, and with the
make argument, it will first call top-prepare.mk and top-make.mk
(both are in the reproduce/analysis/make directory).
In terms of
organization, top-prepare.mk
and top-make.mk have an identical design,
only minor differences. So, let's continue Maneage's
architecture with top-make.mk. Once you
understand that, you'll clearly
understand top-prepare.mk also. These
very high-level files are relatively short and heavily
commented so hopefully the descriptions in each
comment will be enough to understand the general
details. As you read this section, please also look at
the contents of the mentioned files and directories to
fully understand what is going on.
Before starting to look into the
top top-make.mk, it is important to
recall that Make defines dependencies by
files. Therefore, the input/prerequisite and output of
every step/rule must be a file. Also recall that Make
will use the modification date of the prerequisite(s)
and target files to see if the target must be re-built
or not. Therefore during the processing, many
intermediate files will be created (see the tips
section below on a good strategy to deal with
large/huge files).
To keep the source and (intermediate) built files
separate, the user must define a top-level
build directory variable (or $(BDIR)) to
host all the intermediate files (you defined it
during ./project configure). This
directory doesn't need to be version controlled or
even synchronized, or backed-up in other servers: its
contents are all products, and can be easily
re-created any time. As you define targets for your
new rules, it is thus important to place them all
under sub-directories of $(BDIR). As
mentioned above, you always have fast access to this
"build"-directory with the .build
symbolic link. Also, beware to never make any
manual change in the files of the build-directory,
just delete them (so they are re-built).
In this architecture, we have two types of
Makefiles that are loaded into the
top Makefile: configuration-Makefiles
(only independent variables/configurations)
and workhorse-Makefiles (Makefiles that
actually contain analysis/processing rules).
The configuration-Makefiles are those that satisfy
these two wildcards:
reproduce/software/config/*.conf (for
building the necessary software when you
run ./project configure)
and reproduce/analysis/config/*.conf (for
the high-level analysis, when you run ./project
make). These Makefiles don't actually have any
rules, they just have values for various free
parameters throughout the configuration or
analysis. Open a few of them to see for
yourself. These Makefiles must only contain raw Make
variables (project configurations). By "raw" we mean
that the Make variables in these files must not depend
on variables in any other configuration-Makefile. This
is because we don't want to assume any order in
reading them. It is also very important
to not define any rule, or other Make
construct, in these configuration-Makefiles.
Following this rule-of-thumb enables you to set these configure-Makefiles as a prerequisite to any target that depends on their variable values. Therefore, if you change any of their values, all targets that depend on those values will be re-built. This is very convenient as your project scales up and gets more complex.
The workhorse-Makefiles are those satisfying this wildcard
reproduce/software/make/*.mk
and reproduce/analysis/make/*.mk. They
contain the details of the processing steps (Makefiles
containing rules). Therefore, in this phase order
is important, because the prerequisites of most
rules will be the targets of other rules that will be
defined prior to them (not a fixed name
like paper.pdf). The lower-level rules
must be imported into Make before the higher-level
ones.
All processing steps are assumed to ultimately
(usually after many rules) end up in some number,
image, figure, or table that will be included in the
paper. The writing of these results into the final
report/paper is managed through separate LaTeX files
that only contain macros (a name given to a
number/string to be used in the LaTeX source, which
will be replaced when compiling it to the final
PDF). So the last target in a workhorse-Makefile is
a .tex file (with the same base-name as
the Makefile, but
in $(BDIR)/tex/macros). As a result, if
the targets in a workhorse-Makefile aren't directly a
prerequisite of other workhorse-Makefile targets, they
can be a prerequisite of that intermediate LaTeX macro
file and thus be called when necessary. Otherwise,
they will be ignored by Make.
Maneage also has a mode to share the build
directory between several users of a Unix group (when
working on large computer clusters). In this scenario,
each user can have their own cloned project source,
but share the large built files between each other. To
do this, it is necessary for all built files to give
full permission to group members while not allowing
any other users access to the contents. Therefore
the ./project configure and
./project make steps must be called with
special conditions which are managed in
the --group option.
Let's see how this design is implemented. Please
open and inspect
top-make.mk it as we go along here. The
first step (un-commented line) is to import the local
configuration (your answers to the questions of
./project configure). They are defined in
the configuration-Makefile
reproduce/software/config/LOCAL.conf
which was also built by ./project
configure (based on
the LOCAL.conf.in template of the
same directory).
The next non-commented set of the
top Makefile defines the ultimate target
of the whole project (paper.pdf). But to
avoid mistakes, a sanity check is necessary to see if
Make is being run with the same group settings as the
configure script (for example when the project is
configured for group access using
the ./for-group script, but Make
isn't). Therefore we use a Make conditional to define
the all target based on the group
permissions.
Having defined the top/ultimate target, our next
step is to include all the other necessary
Makefiles. However, order matters in the importing of
workhorse-Makefiles and each must also have a TeX
macro file with the same base name (without a
suffix). Therefore, the next step in the top-level
Makefile is to define the makesrc
variable to keep the base names (without
a .mk suffix) of the workhorse-Makefiles
that must be imported, in the proper order.
Finally, we import all the necessary remaining
Makefiles: 1) All the analysis configuration-Makefiles
with a wildcard. 2) The software
configuration-Makefile that contains their version
(just in case its necessary). 3) All
workhorse-Makefiles in the proper order using a Make
foreach loop.
In short, to keep things modular, readable and manageable, follow these recommendations: 1) Set clear-to-understand names for the configuration-Makefiles, and workhorse-Makefiles, 2) Only import other Makefiles from top Makefile. These will let you know/remember generally which step you are taking before or after another. Projects will scale up very fast. Thus if you don't start and continue with a clean and robust convention like this, in the end it will become very dirty and hard to manage/understand (even for yourself). As a general rule of thumb, break your rules into as many logically-similar but independent steps as possible.
The reproduce/analysis/make/paper.mk
Makefile must be the final Makefile that is
included. This workhorse Makefile ends with the rule
to build
paper.pdf (final target of the whole
project). If you look in it, you will notice that this
Makefile starts with a rule to create
$(mtexdir)/project.tex
(mtexdir is just a shorthand name for
$(BDIR)/tex/macros mentioned before). As
you see, the only dependency of
$(mtexdir)/project.tex
is $(mtexdir)/verify.tex (which is the
last analysis step: it verifies all the generated
results). Therefore,
$(mtexdir)/project.tex is the
connection between the processing/analysis steps
of the project, and the steps to build the final
PDF.
During the research, it often happens that you want to test a step that is not a prerequisite of any higher-level operation. In such cases, you can (temporarily) define that processing as a rule in the most relevant workhorse-Makefile and set its target as a prerequisite of its TeX macro. If your test gives a promising result and you want to include it in your research, set it as prerequisites to other rules and remove it from the list of prerequisites for TeX macro file. In fact, this is how a project is designed to grow in this framework.
File modification dates (meta data)
While Git does an excellent job at keeping a history of the contents of files, it makes no effort in keeping the file meta data, and in particular the dates of files. Therefore when you checkout to a different branch, files that are re-written by Git will have a newer date than the other project files. However, file dates are important in the current design of Maneage: Make checks the dates of the prerequisite files and target files to see if the target should be re-built.
To fix this problem, for Maneage we use a forked
version of
Metastore. Metastore
use a binary database file (which is
called .file-metadata) to keep the
modification dates of all the files under version
control. This file is also under version control, but
is hidden (because it shouldn't be modified by
hand). During the project's configuration, Maneage
installs to Git hooks to run Metastore 1) before
making a commit to update its database with the file
dates in a branch, and 2) after doing a checkout, to
reset the file-dates after the checkout is complete
and re-set the file dates back to what they were.
In practice, Metastore should work almost fully
invisibly within your project. The only place you
might notice its presence is that you'll see
.file-metadata in the list of
modified/staged files (commonly after merging your
branches). Since its a binary file, Git also won't
show you the changed contents. In a merge, you can
simply accept any changes with
git add -u. But if Git is telling you
that it has changed without a merge (for example if
you started a commit, but canceled it in the middle),
you can just do git checkout
.file-metadata and set it back to its original
state.
Summary
Based on the explanation above, some major design points you should have in mind are listed below.
Define new
reproduce/analysis/make/XXXXXX.mkworkhorse-Makefile(s) with good and human-friendly name(s) replacingXXXXXX.Add
XXXXXX, as a new line, to the values inmakesrcof the top-levelMakefile.Do not use any constant numbers (or important names like filter names) in the workhorse-Makefiles or paper's LaTeX source. Define such constants as logically-grouped, separate configuration-Makefiles in
reproduce/analysis/config/XXXXX.conf. Then set this configuration-Makefiles file as a prerequisite to any rule that uses the variable defined in it.Through any number of intermediate prerequisites, all processing steps should end in (be a prerequisite of)
$(mtexdir)/verify.tex(defined inreproduce/analysis/make/verify.mk).$(mtexdir)/verify.texis the sole dependency of$(mtexdir)/project.tex, which is the bridge between the processing steps and PDF-building steps of the project.
Next: Customization checklist, Previous: Why Make?, Up: About